Sunday, October 27, 2013

Spooktacular Fun!

Just a quick weekend post to show you what my mom and I have been doing to keep busy.


Are these adorable or what?  Trick or treating will certainly be spooktacular!  We just took canvas and stitched into a simple bag and added handles.  We designed each pattern and appliqued onto the bags.  I love that they are personalized for each child.  The pictures aren't the greatest, but we added lots of fun little Halloween buttons too.  The kids just love them!  They can't wait to use them for trick-or-treating!


Saturday, October 26, 2013

Catina Cat

Happy Friday!  I have never been more pumped for it to be Friday!  Some weeks are just like that.  My mom is visiting from Minnesota (YAY!) and we are ready to get our "spook" on with costume making, pumpkin carving, Halloween parties, and some fun fall baking.  Let the weekend begin!

Meanwhile, it was our zoo-phonics themed third day with the 3-year-olds.  Today we focused on Catina Cat.  This is always a favorite of the children.  I think mainly because it is such a familiar and beloved animal for children. 

 At circle time I read many wonderful books about cats.  You can click the pictures below to take you to the link.

We really loved reading Grumpy Cat and making our own grumpy cat faces.  At the end of the book, we learned that the cat wasn't so grumpy anymore and we used our faces to express the new emotions he was feeling.  Those little faces look so cute smiling back at you!

We then took turns tossing balls of yarn into a wicker basket.  One thing I know for sure, 3-year-olds love to be successful.  This little activity was quick and easy, but they loved it nonetheless. Our circle time this week was shorter than usual since we are regularly practicing our Halloween songs for our Halloween Party next week.

During centers we did all sorts of letter "C" themed activities.  Each week we add a different letter craft inspired by the zoo-phonics character for that week to our zoo-phonics alphabet book.  This week we worked on Catina Cat.  They turned out so cute!


I love all the little details the children add to their letter!  Just darling!  I don't fuss too much with the children about where the paws or face end up on the letter.  Since I do a lot of the cutting for them, I let them have the freedom to decide where the pieces go...or how many for that matter.  :)


We worked on sorting and categorization today by matching rainbow goldfish crackers to the correctly colored cat on the sorting mat.  When they were all sorted, we counted how many of each color.  After that, of course, we ate them up!  The cute cats came from mailbox magazine a few years back.


This year, the children love centers with food!  They are always a huge hit!  So today, there was also a little center where the children got to make their own "Cat Nip".  Our cat nip was just a simple snack mix of assorted goldfish crackers, raisins, and pretzels.  Too cute and so easy.

In the books we read today, the authors talked about cats scratching with their paws.  This was a perfect opportunity for us to use our own little paws to "scratch" the letter "C" in the salt trays.  I can usually get a few good "C's" in before they just start playing in the trays.


If you are interested in seeing some more of the zoo-phonics alphabet book, please follow me on pinterest and check out my zoo-phonics board.

Have a great weekend!

Sunday, October 20, 2013

Monsters, Mischief, & More!

Wow!  It has been a busy, busy week!  This week was all about monsters.  I have to say this is one of my absolute, favorite, all time themes!  The possibilities and ideas are endless.  I love teaching with this theme.  I use this theme with both the 3's and young five's classrooms.  Both groups love it!  This post details some of the activities I used this week in my 3-year-old classroom.  It is a great theme to do right before Halloween when we are talking about the difference between real and pretend.

During circle time, I read several books by Ed Emberly and his daughter, Rebecca Emberly. Click on any of the images below to take you to the links for these fantastic books.


There are tons of great monster books for this theme, but these are my favorites.  Especially for my little 3-year-olds.  The illustrations are fun and colorful and I love the flow of the text.  Rather than reading, I "sing" these books.  I am definitely not a singer, but the kids love it (okay...me too)!

One of my favorite activities to do with There Was an Old Monster is this story retelling activity from Making Learning Fun.  I have been doing this little activity for three years now and it never gets old...only better.  Basically, you pass out small laminated picture cards of everything the monster ate.  As you retell the story, the children get to put their piece inside a large monster pocket/envelope with a window where the monster's stomach would be.  The kids especially love when I shake the monster around and they can see the little pieces move about inside the monster's belly.

After reading these great books we did tons of fun centers.  Here are just a few.

This was most definitely a favorite.  I used floral aqua beads that I soaked in water overnight.  I added them to our sensory bin and threw in a few monster eyeballs from the dollar store.  They couldn't get enough!


Honestly, these are the coolest things ever!  I like to add them to my teacher wish list at the beginning of the year.  They are nice to have on hand for all sorts of themes and activities.  Click the image below for a link.


We practiced our 1:1 counting skills with this fun activity.  They looked at the numeral and counted the number of eyeball stickers on the monster mat.  They then added that number of googly eyes to the monster mat.  I am sorry to say I cannot remember where I found these cute little mats years ago.  :(


We continued to focus on this skill when we fed our cereal box monsters all sorts of creepy crawlies.  I had the children roll a single die, count the dots, and then feed the monster that many bugs.


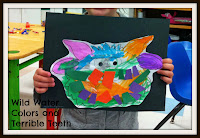
Our art project this week incorporated some fine-motor/scissor practice .  BONUS!  I had the children snip 1" wide strips of colorful paper for the monster teeth, which we saved.  We used liquid water colors to paint a monster picture I found years ago from Mailbox Magazine.  When dry, we pasted out terrible monster teeth onto the monster's mouth.  I always love the way these turn out!  When finished, I cut them out and used black construction paper as a matte.


Of course, no preschool classroom is complete without play dough.  Here are a few pictures of the fun we had with play dough, monster style.


I hope that this post gives you tons of inspiration for monstrous mischief and mayhem.
Happy Fall and Happy Halloween!


Saturday, October 12, 2013

Blog Button or Bust!

Well this little endeavor of "starting a blog" has proved to be QUITE a learning experience.  My first task, create a button for my blog and a grab box to go along with it.  Easy enough, right?  As the title of this post suggests, it was almost a bust.  After several sanity breaks (with ample amounts of coffee) and affirmations that I am an intelligent person I was able to finally figure things out.  Yippee for me! So, if you would like to help a girl out and let her know her efforts weren't in vain, please grab my button.  :) I promise I will have things worth grabbing my button for very soon.

For those of you trying to create your own blog button, I found this site very helpful for navigating my way through the process.

I would also highly recommend using PicMonkey to create your button.

A)  It is easy.
B)  It is free
C)  It has a lot of fun tools you can use to enhance and bling up your button!

If you would like to try it out and give it a whirl, you can find a link to PicMonkey here.

As you will notice, I did not use a photo when creating my button.  Instead of uploading a photograph, I downloaded digital paper and then uploaded it to PicMonkey.  From there, all the steps are exactly the same.  Once I finished creating the button, I saved it to my computer and then uploaded it to photobucket. 

So that was definitely the easy and fun parts of this little project.  The tutorial provides the html code you need to copy and paste so that you can display your blog button as well as a blog button grab box. The tutorial does a very nice job explaining all the steps necessary to do this successfully.  Be sure to focus on step #4.  That allows you to do both the button and grab box in one step.  

**On a side note, I did find I needed to go back into what I pasted and change the quotes to "straight quotes".  If you are having difficulty, that may be the source of the problem.  She does touch upon this briefly in the tutorial.

Friday, October 11, 2013

Welcome to The Pre-K Crayon Box!

Hello and welcome to my newest endeavor, the pre-k crayon box...it is definitely a work in progress, so bear with me as I enter this new and exciting journey!  I hope that this blog can offer inspiration and smiles to all of its viewers.

So, to start off, here is a little bit about me.  My name is Meredith Long.  I am a wife to a terrific guy (a little obsessed with football, but terrific none the less) and mother to four beautiful and amazing children, two girls and two boys. Here they are, could they be any cuter?

The Fab Four

I am definitely one lucky lady!  They give me tons of inspiration and great ideas for the classroom and even help me test out ideas before I put them to use!  In my free time I love to read, take long walks, go for bike rides, and cook big Sunday dinners for my family.

I have been teaching for as long as I can remember, literally!  My very first student was my younger brother, Andrew, who I forced every day after school to sit in front of my chalkboard easel (it must have worked, he now has his doctorate in medicine).  More recently, I have moved on to a classroom of "young fivers".  I am fortunate enough to teach at the most amazing preschool, EVER, five afternoons a week in their pre-k classroom.  I love it!  In addition to teaching pre-k, I also get to teach the cutest bunch of 3-year-old students, three mornings a week.  I work with the most amazing group of teachers and director.  They make my job so much fun.  It is a great team to be a part of and very supportive.  To top it off, the families who attend my preschool are unbelievable.  They are so generous.  They volunteer, donate, cut out projects, tackle fundraisers, and occasionally even bring coffee!  What more could you ask for?!

So that is me in a nutshell.  I am definitely more nut than shell.  I hope you check back often to see what is going on in my classroom, my latest ideas, and what is inspiring me.


Related Posts Plugin for WordPress, Blogger...